|
|
Document 112
How to add float.sty to a document style
Version: 2.5 - Scientific WorkPlace & Scientific Word
Note
If you are using SW/SWP 3.0 or later, see
Using the float package with SW/SWP.
The float.sty package provides for precise placement of floating tables and
figures in documents created with non-Style Editor styles. You must use
floating figures and tables to add captions that appear in the List of Figures
and List of Tables. The steps below explain how to add the package to your
document style. Note that the procedure differs for LaTeX2e and LaTeX2.09
styles. Note too that the procedure differs for placing figures and tables
with float.sty.
To add float.sty to your LaTeX2e document style
-
Open your SW document.
-
From the File menu, choose
Style.
-
Choose Add Packages.
-
Click the arrow next to the Base Package box.
-
Select float.sty.
If the package isn't visible:
-
Choose Cancel.
-
Click Go Native.
-
When the Go Native dialog box opens, position the insertion point at the end
of the last entry in the packages box.
-
Type the name of the package you want, enclosed in curly braces, like this:
{float}.
-
Choose OK to leave the dialog box.
-
Choose OK twice to return to your document.
-
Change the Preamble of your document to include the float.sty option:
-
From the File menu, choose
Document Info.
-
Choose the Preamble tab.
-
After the line that reads \input tcilatex, add these
lines:
\floatstyle{plain}
\restylefloat{table}
\restylefloat{figure}
\floatplacement{table}{H}
\floatplacement{figure}{H}
The \floatstyle command can be followed by one of three options:
-
plain places the caption on the bottom.
-
ruled places the caption on top and adds rule
lines.
-
boxed places the caption on the bottom and puts a
box around the floating object.
-
Choose OK.
To add float.sty to your LaTeX 2.09 document style
-
Open your SW document.
-
From the File menu, choose
Style.
-
Choose Go Native.
-
In the Options area of the Native LaTeX Style dialog box, type the command
,float.
-
Choose OK to close the dialog box.
-
Choose OK to return to your document.
-
Change the Preamble of your document to include the float.sty option:
-
From the File menu, choose
Document Info.
-
Choose the Preamble tab.
-
After the line that reads \input tcilatex, add these
lines:
\floatstyle{plain}
\restylefloat{table}
\restylefloat{figure}
\floatplacement{table}{H}
\floatplacement{figure}{H}
If you don't want the caption under the floating object, change the
\floatstyle option as described above.
-
Choose OK.
To use float.sty to position a floating table
-
Insert the table:
-
From the File menu, choose
Import Fragment.
-
From the Import Fragment dialog box, choose
table4_3 and then choose
OK.
-
The program inserts a fragment containing a table with four rows and three
columns, like this:
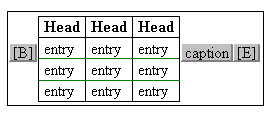
-
Edit the properties of the TeX field containing [B]:
-
Select the field.
-
From the Edit menu, choose
Properties.
SW opens a TeX Field dialog box that contains this string:
\begin{table}[tbp]\centering.
-
Change [tbp] to [H].
-
Choose OK.
To use float.sty to position a floating figure
-
Modify the tcilatex.tex file:
-
Use an ASCII editor to open the tcilatex.tex file, which is in the sw25\tex\macros\tci directory.
-
Find the second line, which reads \begin{figure}[#1]%
-
Change [#1] to [H].
-
Save the changes, close the file and exit the ASCII editor.
-
Insert the figure.
-
Select the figure.
-
From the Edit menu, choose
Properties.
-
In the Floating Placement area, check
here.
-
Make sure none of the other placement options are selected.
-
Choose OK.
Last revised 02/21/06
This document was created with Scientific WorkPlace.
|