|
|
Document 149
How to apply a single caption to multiple figures
Version: 2.x, 3.x, 4.x, 5.x - Scientific WorkPlace & Scientific
Word
Usually, each figure in a document has its own caption. Sometimes, however,
you may want a single caption to apply to more than one figure. You can insert
a caption for multiple figures in two ways: using the
subfig package or, more directly, using a
floating frame as explained here. When you typeset the document, LaTeX
positions the caption correctly.
-
Enter a floating frame:
-
Place the insertion point where you want the figures to appear.
-
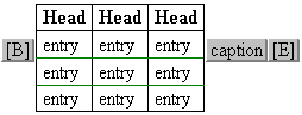
Insert the table4_3 or Table - (4x3, floating) fragment, which looks like this
in Version
5:
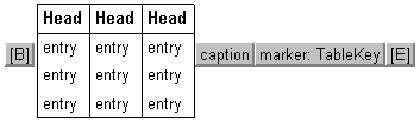
and like this in earlier
versions:
-
Replace the table in the fragment with a new table that contains a cell for
each figure to which you want to apply the caption.
-
Insert the figures:
-
Place a figure in each cell of the new table.
-
For each figure:
-
Select the figure and choose Properties.
-
Select the Frame or
Layout tab.
-
In the Placement section, choose
In Line.
-
Choose OK.
-
Create the caption:
-
Select the gray box marked caption.
-
In the TeX Field dialog, replace the words
Table Caption with the caption you want all the
figures to share.
You can use mathematics in the caption.
-
Choose OK.
-
If you want the figures to be labeled as Figure x
instead of Table x:
-
Select the gray button labeled B.
-
Choose Properties.
-
Change the contents of the TeX field from \begin{table}
\centering to \begin{figure} \centering.
-
Choose OK.
-
Select the gray button labeled E.
-
Choose Properties.
-
Change the contents of the TeX field from
\end{table} to
\end{figure}.
-
Choose OK.
-
If you want individual captions for each figure in addition to the single
caption created in step 3, for each figure:
-
Select the figure and choose Properties.
-
Select the Labeling tab.
-
In the Caption Text box, enter the caption for
the selected figure.
-
Choose OK.
NoteYou
may need to add space or additional table cells before or after the caption to
achieve the typeset appearance you want.
Last revised 08/19/05
This document was created with Scientific WorkPlace.
|