Document 107
Scientific WorkPlace and Scientific Word Version 2.5: Changes, Additions, and Last-minute information
Contents
Operating Systems
Version 2.5 of SW requires one of the following:
-
Windows 3.1, 3.11, or Windows for Workgroups 3.11 running Win32s 1.3
-
Windows 95
-
Windows NT.
32 Bits
The main program and all of the auxiliary programs except for BibDB are compiled for 32 bits. The TrueTeX formatter and previewer are also compiled for 32 bits.
There are two advantages to this:
-
There is a performance improvement.
-
The programs run in the 32-bit worlds of Windows 95 and Windows NT. This means that they participate fully in the preemptive multitasking and cannot affect, or be affected by, other applications.
Multiple Document Interface (MDI)
In response to customer requests, version 2.5 incorporates the Multiple Document Interface (MDI), the Microsoft standard that allows you to open several documents at once. Unlike version 2.01, only one copy of SW version 2.5 will run at a time. However, within the main window of the single running copy, you can open several documents, and you can open several windows on each open document. Our tests indicate that the version 2.5 support for multiple documents is much more robust than the version 2.01 support for opening several copies of SW.
When you first start SW, an untitled document window appears. If you immediately open another document or choose File/New, the untitled window is closed.
You can iconify a document window so that it becomes an icon in the SW main window.
You can also add a second view of an open document: click the title bar of the document's window, then choose Window/New Window.
Although editing changes made in one view are updated in other views, the other views first jump to the first line of the first paragraph in their current layout. This can be several paragraphs above the initial view, causing a surprising jump. To make the updates more stable, first press shift+esc in each of the views---this sets the top of the layout to the top of the view, obviating the jump.
Microsoft Foundation Classes (MFC) Interface Objects
The version 2.5 interface uses the Microsoft Foundation Classes application framework. The use of such a framework assists the cross-platform conversion process. The MFC framework also provides several standard interface objects. The most visible of these are tabbed dialog boxes (also known as property sheets) and the toolbars and status areas.
Property Sheets
Property sheets are dialog boxes with a row of tabs that look like the raised tabs of file folders. They provide a way to combine several dialog boxes into one. In version 2.5, property sheets are used for:
-
Default settings in Tools/User Setup
-
Table and matrix properties
-
Picture and plot properties
-
Maple settings
-
Document Info
Toolbars, Symbol Panels, and Status Area
The new toolbars can be docked at the top, bottom, or sides of the main SW window, with some restrictions. SW remembers where you placed the toolbars from session to session. The toolbars can also float. To move a toolbar to another position, to dock it, or to make it float, you click and drag on a gray area between the buttons.
The symbol panels are toolbars with special behavior. If you click on the Symbol toolbar button associated with a symbol panel, the symbol panel pops up as usual. Clicking on a symbol enters that symbol into your document and dismisses the symbol panel. The button associated with a symbol panel is shown in its depressed state when the associated symbol panel is visible. Symbol panels now have a "mini-frame" with a Close box. If you drag a symbol panel from its pop-up location, it will remain on the screen from session to session and the associated toolbar button will remain depressed, regardless of the number of panel buttons you choose
Use the Close box or click on the associated Symbol toolbar button to dismiss a floating panel. You can also dock a symbol panel---click on the associated button to dismiss a docked symbol panel. At this time, the toolbars and symbol panels cannot be configured, other than to change their position as just described.
Version 2.5 also has new toolbar buttons associated with standard operations like File/New, File/Save, File/Preview, File/Print, Spell Check, and Undo Deletion and with certain mathematical computations.
Version 2.5 supports MFC tooltips---the small yellow explanations that pop up if you leave the mouse pointer over an icon for a few seconds. You can turn tooltips on or off using the View/Toolbars dialog box.
The Status bar the appeared at the bottom of the screen in version 2.01 has been split into three bars---a Status bar, a Tag toolbar, and a Fragments toolbar. The Tag toolbar and the Fragments toolbar now use drop-down list boxes instead of buttons. This change makes it obvious that there is a list of choices available. The Tag toolbar and the Fragments toolbar are standard toolbars, so they can float or be docked at the top or bottom of the screen.
These features of SW version 2.01 are not part of version 2.5:
-
The panel editor
-
The user-configurable cache bar.
New Toolbars Dialog Box
In version 2.01 we had the ability to turn on and off two toolbars and the Status bar. Now, many more toolbars are available, and we have added a new dialog box to manage the explosion in toolbar functionality.
The dialog box shows a list of toolbars, several check boxes, and a Reset button. The check boxes govern whether the associated toolbar is visible on the screen. The Large Buttons check box activates the large buttons. The ToolTips check box activates the tooltips---the small messages that appear in yellow rectangles when you place the mouse pointer over a toolbar button.
The Reset button resets the toolbars to their original configuration. Check Reset to recover toolbars if one or more have inadvertently been placed so that they are active but not visible.
New Style Editor
The Style Editor has been completely redesigned.
-
The program now provides access to many more style attributes, including color.
-
The interface has been improved significantly.
-
Indirection has been reduced. This was one of the most confusing aspects of the old Style Editor. You now set fonts and many other properties directly for each element, rather than by reference to another named object.
The online Help for the Style Editor has been completely reworked and is much more comprehensive. Please use this online Help as your guide to the new version.
Style Editor Layout
The layout of the Style Editor has changed significantly. The new version does not have an initial start-up screen. Pages of parameters previously placed under Categories are now items in one of four main menus:
-
Base. Global style information that affects the whole document.
-
Parts. The style information that affects document parts such as the Index and Table of Contents.
-
Elements. Style elements. These are created for use in other portions of the Style Editor, and for use as paragraph environments and the like.
-
Advanced. Style information that is used less frequently and is more technical.
Removal of Quick Screens
The quick screens are gone. The new program adheres to the maxim that you should be able to set a particular style parameter in only one place. In many cases, the new design incorporates the use of icons for quick setup.
Page Layout
You now have much more flexibility in defining page layout for different parts of the document. Margins, footnotes, columns, margin notes, headers and footers, and page dimensions are set as default values for the entire document in the Base Page Layout area. Exceptional Page layout information is set in the Exceptional Page Layout area. In addition, from the Title page Layout area and the Subsequent page Layout area, you can override the default specifications set in Base Page Layout.
Paragraph Specifications
The ability to set paragraph specifications exists in many different parts of the Style Editor, but now you enter this information in a paragraph format dialog box.
Font Specifications
Fonts are also specified directly for many different elements of the style. You make the settings for each element directly, rather than creating a named font object and then referencing the name.
Font Scheme Editor
The font scheme editor in the Advanced menu provides the tools to set up different font schemes, and in particular, to access new fonts. Adding a new font requires that you first have the TeX tfm (TeX Font Metric) file for the font. This can be generated using the Export Metrics dialog box in the TrueTeX Previewer. A brief description of the process for adding a new Windows TrueType font to a Style Editor font scheme is given in the Style Editor on-line help.
Document Divisions
Divisions include chapters, sections, and subsections. Division handling is improved. The Division dialog box now does the full work of creating a division head. In the previous Style Editor, the complete process involved several different dialog boxes. This is one of the most powerful, and most complicated, parts of the new Style Editor.
Paragraph and Environment Combined
The settings in the paragraph and environment dialog boxes have been combined in the Paragraph Environment dialog box. You can now put run-in text at the beginning of an environment.
Color Options
If you have access to a color printer, you can create color printouts using the new Style Editor. The colors are visible in the previewer. You can also specify the SW display color and screen font for text tags.
Documentation
The new online Help is significantly improved. Online Help features dynamic illustrations of many Style Editor screens. To learn more about a field in a dialog box, move the mouse pointer to the field in the Help illustration. If a hand appears, help is available for that item. Click the item to jump to the explanation.
Preview Button
You can now preview a style without having to go through SW. This can save a great deal of time when you are developing a style. Two preview options are available:
-
If a Preview button appears on the current Style Editor screen, press it to preview a built-in document that shows you the effect of the specifications on the current screen. The Lists screen provides a good example of this feature.
-
Choose your own document for direct previewing from the Style Editor. To do this, choose Preview User Documentfrom the File menu.
Hypertext Links
Hypertext links have been implemented within a document. Use Insert/Field/Hypertext Link to insert a link. The target of a hypertext link is a marker or any object that has an identifying key, such as an equation, a figure, or a bibliography item.
To jump to the target of a link, ctrl+click the link, or place the insertion point within the link and choose Tools/Action. The insertion point jumps to the start of the paragraph containing the specified marker or the object with the specified key.
The Back button on the Navigate toolbar and the Go/History Back menu item provide ways for you to retrace jumps you make with hypertext links, citations, cross-references, and the jumps to sections.
Go/View History lists the sections you have visited using jumps. Double-click an item from the list to go to the corresponding place in your document.
Entries in the History list are created by choosing Tools/ Action for any object that jumps to a marker (such as a hypertext link or a citation), by choosing any of the jumps on the Go menu, by ctrl+clicking an active link object, or using any of the items on the Navigate toolbar. The History list shows the section containing the paragraph to which you jumped.
Once the History list is started, the Go/View History item is enabled, as is the Back button on the Navigate toolbar. You can also go back by pressing \ctrl+alt+left arrow.
Sections appear in the History list and in the Navigate toolbar Section Headings list if their tags have a TAGLEVEL= statement in the .cst file for the current document style. See \swp25\extras\techref.tex for more information about .cstfiles.
Citations and Cross-References
The Insert/Field/Citation dialog box now has a drop-down list box you can use to select the key of the bibliography item.
The Page Reference and Cross Reference dialog boxes have been combined, and the new Cross Reference dialog box also has a drop-down list box for choosing the marker or key associated with the cross-referenced object.
Citations and cross-references are effectively hypertext links. Ctrl+click a citation or cross-reference to jump to the target, or select the citation or cross-reference and choose Tools/Action.
Markers
The Insert/Field/Marker dialog box also uses a drop-down list box. Use this list to view the markers you've already defined.
Table of Contents
The section containing the insertion point or the start of the current selection shows in the Section Headings area of the Navigate toolbar. Open the drop-down list to see a complete list of section headings, which serves as a table of contents. Click a section to jump to that section. The sections to which you jump are added to the History list.
You can also move to the previous or next section using the Go/Previous Section and Go/Next Section commands and using the arrow buttons on the Navigate toolbar.
Language Support
The new 32-bit TrueTeX previewer supports TeX's virtual fonts. We have included a set of the DC fonts. These are 256-character Computer Modern Roman fonts that provide support for Western European languages and some Eastern European languages.
We have also included extended versions of the Times New Roman, Arial, and Courier fonts. Although these do not provide the full set of characters in the DC fonts, they include all of the ANSI characters. These fonts are used by several of the Style Editor styles.
The LaTeX format file included with this version includes the hyphenation patterns for all of the languages for which the hyphenation patterns from the CTAN archives would compile. The most recent version of Babel, the multilingual LaTeX system, is also included. Babel is now compatible with LaTeX2e. To experiment with the hyphenation patterns, follow these steps:
-
Choose File/Style.
-
Choose Add Packages.
-
Select Babel and a language option.
These language choices are available:
-
English
-
UK English
-
Catalan
-
Danish
-
Spanish
-
French
-
German
-
Italian
-
Latin
-
Dutch
-
Polish
-
Portuguese
Babel also works with Style Editor styles. If you use a standard LaTeX style such as Standard LaTeX Book, the Babel language choice automatically changes to the correct form for words like "Chapter." You can use the Style Editor to make these changes yourself to the Style Editor styles.
Once you have added the Babel option to the style, you can switch languages using the \selectlanguage statement in a TeX field. For example:
Philosophie Der Anspruch von Scientific WorkPlace und Scientific Word besteht darin, den Wissenschaftler bei der Eingabe von Text oder Mathematik vom Formatieren zu befreien, damit er sich vollkommen auf den Inhalt des Dokumentes konzentrieren kann. Die einmaligen Vorteile die durch das elegante Kerning, die Ligaturen und das automatische Formatieren komplizierter mathematischer Formeln entstehen, das Ihnen TeX zur Verfügung stellt, können Sie in Scientific WorkPlace und Scientific Word nutzen, ohne die Syntax und die Befehlscodes von TeX zu kennen. Das Resultat ist eine unerreichte Ausgabequalität.
(Albert Camus: L'Étranger, Avant-propos) J'ai résumé L'Étranger, il y a longtemps, par une phrase dont je reconnais qu'elle est très paradoxale: << Dans notre société tout homme qui ne pleure pas à l'enterrement de sa mère risque d'être condamné à mort.>> Je voulais dire seulement que le héros du livre est condamné parce qu'il ne joue pas le jeu. En ce sens, il est étranger à la société où il vit, il erre, en marge, dans les faubourgs de la vie privée, solitaire, sensuelle. Et c'est pourquoi des lecteurs ont été tentés de le considérer comme une épave. On aura cependant une idée plus exacte du personnage, plus conforme en tout cas aux intentions de son auteur, si l'on se demande en quoi Meursault ne joue pas le jeu. La réponse est simple: il refuse de mentir. Mentire ce n'est pas seulement dire ce qui n'est pas. C'est aussi, c'est surtout, dire plus que ce qui est et, en ce qui concerne le coeur humain, dire plus qu'on ne sent. C'est ce que nous faison tous, tous les jours, pour simplifier la vie. Il dit ce qu'il est, il refuse de majorer ses sentiments, et aussitôt la société se sent menacée. On lui demande par exemple de dire qu'il regrette son crime, selon la formule consacrée. Il répond qu'il éprouve à cet égard plus d'ennui que de regret véritable. Et cette nuance le condamne.

L'Étranger
(Jorge Luis Borges: "La Biblioteca de Babel" El universo (que otros llaman la Biblioteca) se compone de un número indefinido, y tal vez infinito, de galerías hexagonales, con vastos pozos de ventilación en el medio, cercado por barandas bajísimas. Desde cualquier hexágono, se ven los pisos inferiores y superiores: interminablemente. La distribución de las galerías es invariable. Veinte anaqueles, a cinco largos anaqueles por lado, cubren todos los lados menos dos; su altura, que es la de los pisos, excede apenas la de un bibliotecario normal. Una de las caras libres de a un angosto zaguán, que desemboca en otra galería, idéntica a la primera y a todas. A izquierda y a derecha del zaguán hay dos gabinetes minúsculos. Uno permite dormir en pie; otro, satisfacer las necesidades fecales. Por ahí pasa la escalera espiral, que se abisma y se eleva hacia lo remoto. En el zaguán hay un espejo, que fielmente duplica las apariencias. Los hombres suelen inferir de ese espejo que la Biblioteca no es infinita (si lo fuera realmente, a qué esa duplicación ilusoria?); yo prefiero soñar que las superficies bruñidas figuran y prometen el infinito... La luz procede de unas frutas esféricas que llevan el nombre de lámparas. Hay dos en cada hexágono: transversales. La luz que emiten es insuficiente, incesante.
Como todos los hombres de la Biblioteca, he viajado en mi juventud; he peregrinado en busca de un libro, acaso del catálogo del catálogos; ahora que mis ojos casi no pueden descifrar lo que escribo, me preparo a morir a unas pocas leguas del hexágono en que nací. Muerto, no faltarán manos piadosas que me tiren por la baranda; mi sepultura será el aire insondable: mi cuerpo se hundirá largamente y se corromperá y disolverá en el viento engendrado por la caída, que es infinita. Yo afirmo que la Biblioteca es interminable. Los idealistas arguyen que las salas hexagonales son una forma necesaria del espacio absoluto o, por lo menos, de nuestra intuición del espacio. Razonan que es inconcebible una sala triangular o pentagonal. (Los místicos pretenden que el éxtasis les revela una cámara circular con un gran libro circular de lomo continuo, que da toda la vuelta de las paredes; pero su testimonio es sospechoso; sus palabras, oscuras. Ese libro cíclico es Dios.) Básteme, por ahora, repetir el dictamen clásico: La Biblioteca es una esfera cuyo centro cabal es cualquier hexágono, cuya circunferencia es inaccesible.
Babel presents some major unsolved problems for us. The most important of these is that most Babel language setups define active characters. For example, the German style makes the double quote (") active, so that ü can be encoded in the LaTeX source file as "u instead of \"{u}. The active characters are intended to make text entry easier with standard text editors. There is no advantage with SW.
SW assumes that characters do not have different meanings depending on the current style. This means that documents encoded under the assumption that there is a non-standard set of active characters will not be correctly interpreted by SW.
On the other hand, documents produced by SW are encoded with the standard LaTeX active characters ($ for math, ^for superscript, etc.). These documents work correctly with Babel, because Babel also handles the standard encodings. Thus, it is documents produced outside of SW that will not be interpreted correctly when read by SW.
Another problem caused by active characters is a conflict with SW's \specials for graphics. These specials use double and single quotes as argument delimiters. In earlier versions, the active Babel characters would invalidate the arguments so that LaTeX would not compile the documents, or would prevent graphics from showing. This has been solved by restoring, in tcilatex.tex, the non-active form of the double and single quotes while the FRAME macro is being processed.
The Accented Characters symbol panel has been replaced by three new panels: Latin-1, Latin Extended_A, and General Punctuation. The characters on these panels are from the Unicode character groups of the same name. The General Punctuation set is a subset of the Unicode set of the same name.
SW now looks for a line like \usepackage[cp850]\{inputenc} in your source file. This is the new input encoding package that is part of the latest standard LaTeX release. The option in brackets is the name of the code page with which your document is encoded. If there is no such statement, SW assumes that your document uses a 7-bit encoding.
If you load a document, then use File/Style to change the encoding, it will be written out using the new encoding. We recommend that you always encode using 7 bits when you want a document to be truly portable.
The code pages supported are cp850, cp437, latin1, latin2, and applemac.
The keyboard support within SW has been rewritten to accept the characters from non-US keyboards and to handle the Alt Gr key.
Language options have been added in the File/Style/Options dialog box for some of the styles.
Limitations
At this time, there are some important limitations regarding language support. The full support for Latin-1 and Latin Extended-A characters works only under these conditions:
-
Using the DC fonts.
-
Under Windows 95 and Windows NT.
-
With the US/Western European Windows code page.
Under the Eastern European code page, SW allows you to enter and display all of the characters in the Latin-1 and Latin Extended-A symbol panels. The .texfile produced is also correct. However, the TrueTeX previewer does not display or print all of the characters correctly. This is because the operating system reassigns the character positions in the TrueType fonts, moving them to positions that are not correct. We are working on a solution to this problem that should be available in the near future.
Under the US/Western European code page, a number of characters are missing from the Times New Roman, Arial, and Courier New TrueType Latin Extended-A set when it is processed by TeX. You can see this by importing the contents of \swp25\docs\unicode.tex into a Style Editor article style document, and then previewing the resulting document. Again, this is a problem that we are working on and will have a solution for in the near future.
To check the status of the fonts and the Latin Extended-A characters on your system, preview the document unicode.tex.
Lead-in Enhancements
In SW, you have always been able to override the automatic numbering of numbered lists with text of your own. The same is true of bullet items and, of course, of custom items. However, the text you use to override was entered in a standard Windows text box. Active TeX characters like <,>, and $ caused problems if they were used with incorrect LaTeX syntax. You can now enter mathematics and special characters and you can apply tags to the text of lead-in items. You can use the toolbars and the Tag toolbar to enter and tag text and mathematics.
Enhancements to Screen Appearance
The appearance of list item lead-ins, theorem lead-ins, and picture captions is now controlled by settings in the .cst files. The default is a yellow background. You can set the font and the background (transparent is a choice) for each lead-in. The settings are much more straightforward, and you have control over the spacing between the lead-in and the following text. Spacing can also be set above and below captions. Please see \swp25\extras\techref.tex for more information on .cstfiles.
Spaces, Rules, Fills, and Breaks
The LaTeX spacing, rule, horizontal fill, and break objects are now active on the SW screen. The Insert/Spacing menu contains these items:
-
Horizontal Space
-
Vertical Space
-
Rule
-
Break
The objects that replace these fragments are now active and available through the new dialog boxes:
-
allowbrk
-
dotfill
-
hspace
-
newline
-
rhspace
-
smallskp
-
bigskip
-
hfill
-
medskip
-
newpage
-
rule
-
strut
-
break
-
hrulfill
-
mstrut
-
rhfill
-
rvspace
-
vspace
The vfill and rvfill fragments remain. We have no plans to implement these in active form in the near future as they don't make sense in the scroll view on the screen.
The fill objects are all entered using the Custom option on the Horizontal Space dialog box. The options to fill a stretchy space with a line or dots are available only when you set the stretch factor to 1. Here are some examples:
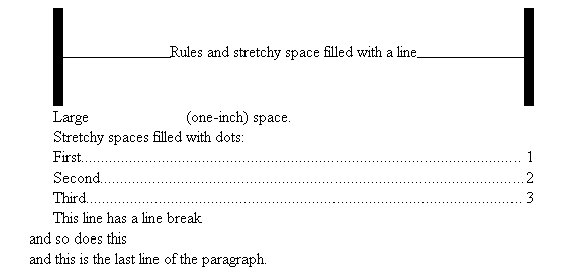
The keyboard shortcut for entering a new line is shift+enter.
External Application Launch
Use the Insert/Field/External Program Call dialog box to insert a call to an external program. For example, if you choose the Solitaire item and enter "Solitaire" as the text, you obtain an object that looks like a hypertext link. Place the insertion point to the right of the object and choose Tools/Action, or ctrl+click the object to start the Windows Solitaire game.
This new feature provides a way to call programs such as demonstrations and interactive tutorials from within a SW document. External program calls are represented by "action" objects. In this document these objects appear as rusty red text. To execute an object, you can either have the insertion point in its text and choose Action in the Tools menu, or you can hold down the ctrlkey while you click the left mouse button on its text. Double-clicking on the text of an object opens the Properties dialog box.
Examples
[Note These examples are active only when this document is viewed from within SW.]
Would you like to play some Minesweeper, Freecell or Solitaire?
How about some animation?
Do you want to hear a phone?
Quick Load and Quick Save
If you choose Save for Quick Load in the General page of the File/Document Info dialog box, SW retains a special form of your document file that opens quickly. The file has a .cst extension. The .cstfiles are typically two to three times larger than the original LaTeX documents, so you are trading space for speed.
Because the Quick Load feature is set in the Document Info dialog box, it applies to the currently selected document only.
To experiment with the Quick Load feature, open a document, check the Save for Quick Load box, make a change, and save the document. Close the document, then open it again. You will not see the paragraph count as the document loads. The load time for quick-load documents is more or less independent of the document size.
If you turn off the Export TeX File on Save box, your document will be saved in the special quick-load file, but it will not be passed through the phase that exports it to a LaTeX (.tex) file. This makes saving much faster.
If the Save for Quick Load box is checked, then the Export to TeX on Save box is enabled and may be either checked or unchecked. If Save for Quick Load is unchecked, then the Export to TeX on Save is disabled and is checked.
If Export to TeX on Save is checked (the default), the .texfile gets written when you save. When unchecked, only the quick-load file is saved and the .tex file does not get written (notice that Export to TeX cannot be unchecked unless Save for Quick Load is checked). In this situation, the program asks if you would like to have the .texfile updated when the document is closed. The reason this question is asked at document close time is that SW only allows import of .texfiles. When the .texfile does not get updated, the Import Contents feature may not work as expected.
If Save for Quick Load is checked, then a quick-loading version of the file is saved. Note that this does not apply if a temporary file is created (i.e., there should not be a swp0000.cdxafter you have previewed a modified document). If Save for Quick Load is not checked, then the quick-loading version of the file is not saved and, if a quick-loading version of the file is around, SW attempts to delete it. The .tex file (if it is exported) will contain the TeX comment %TCIDATA{FastLoad}.
User Setup Enhancements
All of the settings in the swp-pro.ini file are now available in the Tools/User Setup dialog box. Several new settings have been added. The following items were present in the .ini file and could only be changed with a text editor:
General
-
Save Find/Replace Text
-
Dialog View
-
Screen Update Delay
-
AMS Left and Right Margins
-
Max Buffered Paragraphs
-
Helper Line Color
-
Use Full Path for Title
Edit
-
Enable Horizontal Scrolling with Mouse
-
Double-click selects or selects and opens Properties dialog box
-
Maximum rows and columns
Files
-
Use Old AUX Files
-
Maximum Recent List Files
-
Directories
Math
-
Automatically Number New Equations
-
AMS Left and Right Margins
-
Default Radical
-
Default Fraction
-
Default Math Name
Compute (Scientific WorkPlace only)
This contains settings to load or unload Maple, and to set up a connection to a Mathematica server.
Paste and Paste Special
In previous versions of SW, text on the clipboard was always interpreted as
SW's internal form. While this allowed you to type $\alpha$
in Notepad and to paste it into SW to
get ![]()
 ,it
led to problems when programs placed invalid expressions on the clipboard.
,it
led to problems when programs placed invalid expressions on the clipboard.
With the Paste Special command, you can specify the format in which text on the clipboard is pasted into your document. You can specify that the text is to be pasted as SW Internal format or as unformatted text, in which case SW does not attempt to interpret it. The Paste Special command is useful for inserting information copied from a line editor so that it appears in your SW document with the line breaks as they appear in the line editor. Fonts specifications made in other applications are not preserved. These formats are available:
-
SW Internal---Interpret the clipboard information for SW and paste the interpreted information into the document.
-
Text, Paste Text as Unformatted Text---Paste the clipboard information exactly as it appears.
-
Text, Paste Text as SW Internal---Interpret the clipboard information for SW and paste the interpreted information into the document.
For example, if you're working in SW and you copy the Greek letter
![]()
 $\alpha $ to the clipboard, then use Paste Special to paste
it into your document in SW Internal format, the program inserts
$\alpha $ to the clipboard, then use Paste Special to paste
it into your document in SW Internal format, the program inserts
![]()
 at the insertion point. If you paste the
![]()
 into your document as Unformatted Text, at the insertion point the program
inserts $\alpha$
into your document as Unformatted Text, at the insertion point the program
inserts $\alpha$
Similarly, you can copy unformatted text from another application and have the
program interpret it in SW Internal format. If you're working in another
application and you place the unformatted text $\alpha on the
clipboard, and then use Paste Special to paste the clipboard contents into
your document as Text in SW Internal format, the program inserts
![]()
 .
.
Please note, however, that incorrectly formed expressions pasted to the clipboard can create problems when the program tries to interpret those expressions as SW Internal format. Note also that although % SW Internal format agrees with TeX and LaTeX for many symbols, it does not agree for many other elements, including matrices and tables.
SW filters and treats clipboard text in much the same way as the ASCII and ANSI document filters. If you want to preserve line ends and spacing from the clipboard, paste into a paragraph that you've tagged as Body Verbatim.
Verbatim Environments
LaTeX's verbatim environments are now treated much like the Body Center environment. There's a new paragraph tag called Body Verbatim. It is also possible to define your own verbatim-like tags---the .cst file entries for Body Verbatim can be copied and modified for this purpose.
Verbatim environments are useful for writing program fragments. For example, a verbatim environment is used for displaying the Maple input lines in the Maple Import style.
To experiment with this feature, we suggest that you copy a program fragment, procedure, or equivalent from a programming editor or an application like Notepad. Create a Body Verbatim paragraph in your document and paste the clipboard contents into it. You'll see that line breaks and spaces are preserved in this environment during paste operations and when you type.
Mathematics and tables entered in a Body Verbatim environment appear as their internal forms after saving and reloading a document.
Relative Paths
In previous versions of SW, subdocuments were included using absolute paths, and all subdocuments had to be in the same directory as the master document. In version 2.5, subdocuments can be in any directory within the master document directory.
First, some terminology. By "master tree" we mean the directory structure that consists of the directory containing the master document and all subdirectories (and their subtrees). By "master relative" we mean relative to the master document. For example, if m.tex is a master document in directory c:/docs/book, and document sec1a.texis a subdocument in c:/docs/book/chap1/sec1, then the master relative path of sec1a.tex is chap1/sec1/sec1a.tex.
-
Inclusions of all subdocuments in the master tree are master relative. Inclusions of graphics are still absolute.
-
All inclusions of files outside the master tree use absolute paths.
-
When SW generates a temporary file in order to, for example, preview or print a subdocument, the temporary file will always be generated in the master document directory. Previously, SW always used the system temporary directory. This change is unavoidable---TeX simply won't compile documents with fully relative paths when subdocuments are in different directories from the master document.
-
To avoid disasters with changed inclusions, the LaTeXparent statement has been modified to specify the directory level of the master document and of the document that includes a subdocument. The statement is now a comment (rather than a macro) so that an ordinary LaTeX setup will handle the subdocument.
-
A typical LaTeXparent statement now looks like this:
\%TCIData\{LaTeXparent=3,1,sub.tex\}
This means that the master document is three levels above the current document, and that the current document is included by sub.tex, which is one level above. The problem addressed here is that of accidentally including the current document in a master document two levels above, say, or at any level other than three above. If we allowed this, any inclusions within the current document would be relative to the old master document and would therefore wrong for the new master document.
Changes to Graphic Search Algorithm
The search algorithm for graphics in a document has been improved. The system first looks in the absolute path given in the \special, then in the corresponding path on the same drive as the document, and finally in the same directory as the document. This change has been made to accommodate the special handler used by the TrueTeX previewer and in the Document Manager Wrap utility.
If you use a text editor to change a file, you can actually use relative paths for graphics, although these are not directly supported.
Maple Enhancements (Scientific WorkPlace only)
This version uses the Maple V Release 3 kernel. Scientific WorkPlace uses a special dynamic link library version of the Maple kernel. This library is not yet available for the Release 4 kernel.
The following sections describe changes to the Maple interface.
Maple Settings (Scientific WorkPlace only)
The Maple Settings dialog box has been reorganized into a tabbed dialog box with the following new options for overriding the program-default values:
-
The function-argument selection method for trigtype functions can be changed.
-
The notation for the imaginary unit can be changed from i to j.
-
The logarithm function log can be changed from base e to base 10 for computations.
-
The following attributes can be changed to affect the initial on-screen appearance of plots:
-
The axes type for both 2D and 3D plots.
-
The line color and line style for 2D plots.
-
The plot style and shading scheme for 3D plots.
-
-
The plotting intervals and the number of data samples can be preselected for many plot types.
Plot Properties (Scientific WorkPlace only)
The Plot Properties dialog box has been reorganized into a tabbed dialog box with the following new features for revising plots:
-
The view intervals can be defined independently of the plotting intervals by not selecting the default option. When the default option is selected, the views are determined by Maple and are shown grayed out.
-
The Approximate Integral plot type settings have been incorporated into the Plot Properties dialog box.
-
The point symbol option Point for 2D-plot types has been changed to display a small circle rather than a cross.
-
The initial display of Polar plots is now performed with autoscaling activated. This property creates a view based upon the extent of the plot rather than the upon the range of the angular parameter.
-
The 2D-Implicit plot type has the attributes: point symbol, line style, line color, and line thickness.
-
The 2D-Vector Field and 2D-Gradient plot types have the line color attribute.
-
The number of samples per grid line for Conformal plots is now adjustable to compensate for conformal stretching.
Plot dialog box before Plot (Scientific WorkPlace only)
The standard behavior of Scientific WorkPlace is to generate a plot immediately with default settings. It is now possible to have the plot dialog box appear before the plot, so that you can change the plot settings first. This is particularly useful for plots that take significant time to be computed and rendered.
To have the plot dialog box appear before the plot, choose the Plot Options tab in the Maple Settings dialog box. Check Display Plot Properties Before Plotting.
Substitution (Scientific WorkPlace only)
We currently accept these forms:
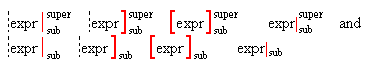
Note that the first three forms in each list have "expr" surrounded by a "fence" from the Brackets dialog box, and the left fence delimiter is the "null delimiter"; that is, an empty bracket. The null delimiter does not print, although it is visible on screen as a dotted vertical line.
The sub and superscripts contain the substitutions that are to be made in the expression. If only a subscript is present, the expression is evaluated at those substitutions. If both are present, we get the expression with the superscript substitutions minus the expression with the subscript substitutions. Here are some examples:

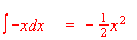
Define this:
![]()

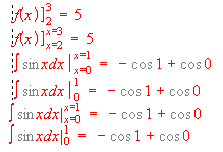
When the superscript and subscript are just numbers, the expression must contain only one variable; otherwise, Scientific WorkPlace reports an error.
Definitions with Deferred Evaluation (Scientific WorkPlace only)
Several users have complained about Maple definitions, which in Scientific
WorkPlace2.01 use the Maple default of full evaluation. The process of full
evaluation applies the results of previous definitions to candidates for new
definitions. Thus, if the definition
![]()
 is followed by the definition
![]()
 ,
then
,
then
![]()
 has a value of 1 under full evaluation. Subsequent changes to the value of
![]()
 do not affect
![]()
 .
Under deferred evaluation, any changes to
.
Under deferred evaluation, any changes to
![]()
 will change the value of
![]()
 .
The process of deferred evaluation is now used in Scientific WorkPlace2.5.
.
The process of deferred evaluation is now used in Scientific WorkPlace2.5.
Subscripts can be Variable (Scientific WorkPlace only)
Define
 . This is now defined as a
function of the subscript
. This is now defined as a
function of the subscript
![]()
 .
One can evaluate
.
One can evaluate
 and
and
 and do the ratio test
 .
.
A dialog box appears when the definition is made, giving you a choice between
regarding the subscript as variable and regarding it as part of the name. If
you defined
![]()
 and
and
![]()
 ,
you might be disconcerted to discover that the second definition had destroyed
the first, even though you would not be surprised that defining
,
you might be disconcerted to discover that the second definition had destroyed
the first, even though you would not be surprised that defining
![]()
 destroys the definition
![]()

Other Enhancements (Scientific WorkPlace only)
-
The Fit Curve to Data dialog box includes an option for selecting the column for the dependent variable when you perform a fit to the matrix of data values.
-
The Vector Calculus Basis Variables dialog box displays the current basis variables when it is activated.
-
Warning messages are now displayed for all dialog boxes with text boxes and spin controls when an entered value has an improper type or is out of range.
-
The controls in many of the dialog boxes are sticky;that is, the states of the dialog box controls are saved between program sessions when the dialog box is accepted.
-
empty set
-
"vee" and "wedge"
-

 and
and
 where
where
 is a user defined function
-
variable for characteristic \& minimum polynomial
Bug Fixes (Scientific WorkPlace only)
A number of bugs reported by users have been fixed. These include the following:
-
A sum of the form "matrix + scalar " is now treated consistently according to the following rule: the scalar is added to each diagonal entry of a square matrix, and to every entry of a nonsquare matrix. The reason for the difference is that
 is interpreted as the nth power of
 under
the matrix multiplication if
under
the matrix multiplication if
 is square and, otherwise, as a matrix consisting of the nth powers of entries
of
is square and, otherwise, as a matrix consisting of the nth powers of entries
of
 .
.
-
"Define Maple Name" now correctly treats functions with no arguments.
-
A number of unnecessary 'x' signs no longer appear in Maple answers.
-
 is now equivalent to exp (x) in implicit differentiation.
-
 and simplify

-
Simplify:
-
We now calculate correctly
 where
where
 and
and
 have been defined to be large integers
-
Solve ODE
 ,
Exact solution is :
,
Exact solution is :
-
These are now calculated correctly:
 and
and

-
These interpretations are consistent:
 and
and
 .
.
-
This is now calculated correctly:

-
 is now correctly interpreted for defined vectors
 and
and
 .
.
-
Define
 and
and
 and
and
 .
Then
.
Then
 .
.
-
Row and column vectors are correctly transformed under transpose and Hermitian transpose operations.
-
Clear Definitions and Undefine will now deactivate the target definitions from the document when Save Definitions is chosen before File/Save. These operations have also been changed to affect definitions made through Define Maple Name.
Mathematica Connection (Scientific WorkPlace only)
MathLink Version 2.2 is a library of routines for communicating between Mathematica for Windows (2.2.3 and later) and external programs. In Scientific WorkPlace 2.5, MathLink's library functions are called to initialize connections, to send and receive data, and to close the connections. Several parameters are necessary to open a link to Mathematica over the MathLink. You set these parameters in the Compute page of the Tools/User Setup dialog box. A general description of the MathLink parameters is as follows:
Name = Path to the Math.exe file in your Mathematica directory.
Mode = The parent-child relationship of the connection.
Protocol = The data transfer protocol used in the communication
Host = The machine on which the other link partner resides.
The default settings in Scientific WorkPlace2.5 are as follows:
Name = c: \win32app\wn22math\math.exe -mathlink
Mode = launch
Protocol = TCP
Host =
If it becomes necessary to change the path in the Name parameter, make the change using the Tools/User Setup/Compute page. The other parameters should not be changed if Mathematica resides on the same machine as SW 2.5. If you wish to have Mathematica loaded when Scientific WorkPlace 2.5starts, select Mathematica in the Engine at Startup box.
Style Selection and Samples
The dialog box for selecting from the list of predefined styles now has check boxes to turn on and off the display of Style Editor, standard LaTeX, and other styles. The dialog box also has a button for viewing a sample of the selected style. If no preview sample exists, the button is disabled.
The .tex and .dvi files used to create and display the samples are contained in the styles\samples directory. If you change one of the sample files, remember to save it and then preview it in order to generate a new .dvi file for the preview feature.
A sample file must have the same name (with the .tex extension) as the section name in the corresponding .lat file. For example, art4.latin the styles\article directory contains a section [lart] for the standard LaTeX article. The corresponding sample files are lart.tex and lart.dvi
Micro Scroll
SW now performs a partial vertical line scroll for objects that are taller than the document window. This makes it possible to edit the lower rows of long tables without reducing the view percentage.
Text Tags for Sizes
Text tags for the standard LaTeX sizes are now visible in most non-Style Editor styles. The tags are tiny, scriptsize, footnotesize, small, normalsize, large, Large, LARGE, huge, and Huge.
Experimental PostScript Filter
The PostScript filter (the filter for .ps files) is now a PostScript interpreter, so you see your picture on screen, even when there is no thumbnail. The original filter is still available. If you need the old filter, change the swp-pro.ini entry for .psfiles from impsi9.flt to imps\_9.flt.
Revise Replaced by Properties
We have eliminated the use of the word "revise," replacing it with "properties" and, where necessary, some additional operations. The old Revise icon has been replaced by a Properties button.
The changed access to tables best illustrates the changes. In version 2.01, you revise a table in order to set up ruled lines, and to add or delete rows and columns. Choosing Edit/Revise (or clicking the Revise icon) opens a dialog box that is essentially a menu. Choices like Alignment and Lines allow you to change properties of the table. Choices like Add Rows are operations on the table. In version 2.5, we have separated the properties from the operations. The Table Properties dialog box is a property sheet with tabs for Alignment and Lines. To add rows or columns, you use the new Edit/Insert Row(s) and Edit/Insert Column(s )choices that appear on the Edit menu when you select a table or matrix. Edit/Insert Row(s) will also appear when you select a multiline display.
Math Name Replaces Function
The old Function dialog box has been replaced by the Math Name dialog box. The new dialog box provides a way to add names to the list.
CST File Changes
The .cst files (the files in the styles directory that control the behaviors of certain input filters and the screen appearance of documents) have been changed so that many styles now show a small margin on each side of the window, and have additional spacing around headings. The .cst file used by this document is an example of this modification. Please let us know if this improves readability.
Please see the document \swp25\extras\techref.tex for more information on .cst files.
Function Key Assignments
The Tag/Function Keys dialog box now provides a way to make function key assignments globally. In previous versions, all function key assignments were made in the .cst file associated with the current document style. This meant that the assignments were not available for editing documents with other styles.
A further enhancement enables you to make assignments to combinations of function keys with ctrl, alt, and shift.
New Menu Items
The following menu items are new:
-
Edit/Select All
-
Window/Close All
Crash Protection
The LaTeX filter has not yet received a major reworking. However, significant changes have been made to prevent crashes when reading documents. Also, if a crash occurs while you're editing, SW now attempts to save all modified documents in files that have the same name but the extension .dmp. When the save is complete, a dialog box appears saying that a serious error has occurred, and that all documents will be closed as the program exits.
Text Tagging in Matrices and Tables
It is now possible to apply text tags to selections in tables that include more than one cell. That is, you can apply the bold text tag to a selection of several cells at once. Note that applying a text tag to a mathematical structure has no effect on substructures within. This is a conscious design decision.
Autosaving
The Autosave operation no longer writes to the .tex file. Instead, it updates the quick-load file. This means autosaving will be performed much more quickly. If your system crashes, the program informs you of the autosaved version of your file the next time you try to open it.
New Document Manager
The Document Manager has been completely rewritten. It now provides support for unwrapping documents and subdocuments into subdirectories, and for redirecting subdocuments and graphics files when you unwrap. You can also exclude all style files or all graphics files from Document Manager operations by checking a box.
The Document Manager can be used in command-line mode. See the online Help in the Document Manager for more information.
MakeIndex
We have switched to MakeIndex as our index-generating program. You will have to update any existing document that contains an index as follows:
-
Load, modify, and save all of that document's subdocuments.
-
In the master document, delete the \begin\{theindex} ... \end{theindex} (probably at the end of the document), and replace it with \printindex (available through the fragment called "index").
The process to generate an index is similar to what it was in the past:
-
Save the master document.
-
Select File/Compile and check the Generate an Index box.
-
Choose OK in the Compile dialog box.
TeX will run twice to generate an unsorted index file. Then MakeIndex will run (it may go by so fast that you don't see it) to generate a sorted index file. Then TeX will run a third time to include the sorted index in the document.
-
Select File/Preview.
-
When the program asks whether you want to use the existing .dvi file, choose Yes.
New Styles
The system now includes a selection of Easy Styles---simple, predefined styles for common types of documents including letters, memos, faxes, exams, and slides. All Easy Styles are identified by the word Easy in the name. These styles are intended to make it easy to write a quick document when fancy formatting is not an issue. Each easy style contains a complete document shell; all you do is replace the shell's text with your own. If you want to try them out, select File/New, and then pick one of the following styles: Easy Letter Style A, Easy Exam Style A, Easy Memo Style A, or Easy Fax Style A.
Key Sequences
The key sequence ctrl+tab no longer moves the insertion point to the next paragraph.
User Contributions
The contrib directory on the CD-ROM contains a selection of user contributions. They are saved in quick load form to make opening and viewing them as fast as possible, and as wrapped (.msg) files to make it easy to unwrap them to your hard disk.
Distributing SW Print Styles
You may include any of the styles developed by our predecessor, TCI Software Research, or MacKichan Software, Inc. with your documents. These styles are not proprietary and can be used freely by anyone.
WARNING: The file tcilatex.tex, included by most SW documents, has changed significantly in this release. It requires LaTeX2e. You should not wrap it when sending files to someone with an earlier version of SW unless you first warn the recipient to save the old version before unwrapping your files.
Miscellaneous
.INI Entries
The following .ini file entries are not available in the Tools/User Setup dialog box, but may be changed using a text editor:
-
RightBtnSelects. The default is 0. Set this to 1 to allow selection with the right mouse button.
-
MaximumNumberOfCells. The default is 10000. This is the limit on the number of cells in a matrix or table.
-
DisplayParagraphUsage. Set this to 1 to display a status bar message that indicates how many paragraphs SW has in memory. The display starts once the number of paragraphs reaches the point the SW considers removing some from memory.
-
HasExtendedFonts. Set this to 1 to indicate that the Windows fonts (Times New Roman, Arial, Courier New) have characters above 255 that can be accessed using the Windows Unicode functions. This makes the screen display of characters in the Latin Extended character set much nicer on screen.
-
PaletteMode. There are two palette modes, a fixed rainbow and a dynamic palette. Please see techref.tex in the \swp25\extras directory for more information.
Forcing View Items
If you use a text editor to insert %TCIDATA\{ViewSettings=31} into the start of your document (immediately above the other items in the preamble), SW will restore the settings of the first five items in the View menu whenever you load the document, and will save the current values for the next load when you save the document. This feature is used in the on-line manuals to force the view settings off. Use this feature for any of your own documents that you want to be viewed with a specific setting of the view items.
Spell Checking Tables
The spelling checker now works in tables.
Spaces, Tabs, and Returns
When you first install SW, pressing the spacebar twice, pressing the tab key in text, or pressing enter twice displays a dialog box. You can set the default behavior for each of these cases using these dialog boxes, and you can change the behavior later using corresponding buttons in the Tools/User Setup/Edit property sheet.
Copying Pictures and Plots
If you click a picture or plot, or select it, then choose Edit/Copy, SW now puts its internal form, and a picture, on the clipboard. To paste this picture into another application, use Paste Special in that application. This provides a much faster way to create an editable plot than the old method of using the print snapshot file.
Printing and Previewing the Online Manuals
Although you can print and preview the online documents from the CD-ROM, you'll discover that the graphics may not appear. To get a complete print or preview, you should use the Document Manager to unwrap the corresponding .msg files for each of the manuals to a writable drive. These files are in the manuals directory on the CD-ROM. Unwrapping places the graphics files in the correct locations for print and preview. Note that the unwrapped files will be slightly larger than the .msg file, in general, so make sure you have enough disk space.
Rename Pasted Graphics As Soon As Possible
Whenever you paste a graphic from the clipboard, SW generates a file for the graphic and inserts a reference to the graphic in your document. The program automatically generates a cryptic name for the file. You should use the Edit/Picture Properties dialog box to rename the graphic file and choose a more descriptive name for the graphics file.
File Save As with Files Containing Graphics
If you create a document that contains graphics, then use File/Save As to create a copy, all of the graphics references in the new document point to the same graphics files that are used by the first document--- SW does not duplicate the graphics. If you want to make copies of the graphics, use the Document Manager from the File menu or via its icon in the SW program group to copy a file to another directory.
Exam Builder
The full installation installs the SW Exam Builder. This program builds exams from a database of questions and answers that you prepare using SW. You create files containing equivalent questions and their answers. The Exam Builder creates exams by selecting at random from among the similar questions. A set of sample question and answer files and a master file are provided as an example. Please check the online Help in the Exam Builder for more information.
Proof Environment in AMS Article and Book
A Proof environment that correctly reads and writes the AmS-LaTeX proof environment has been added to the AMS article and book styles.
Incremental Compilation
Previous versions of SW always compiled documents with LaTeX from scratch whenever the .dvi files were found to be older than the .tex files. With version 2.0, you could use an older .dvi file directly if a document had subdocuments. With version 2.5, you can use older .dvi files under all circumstances.
REDEF
You can now redefine SW's \text output. Normally, the output filter places any text within mathematics in the AMS \text macro. This macro, which is the most versatile way to treat text in mathematics (according to The LaTeX Companion), is defined in tcilatex.tex and in the AmS-LaTeX package. Some users have objected to this because it means their files do not contain plain LaTeX. You can now add a statement like the following to the [FILTERS] section of the .cst file associated with any given style:
\REDEF{\text}{\textrm}
The effect of this statement is to replace all \text{...} statements with \textrm{...}. Instead of \textrm, you can also use \mbox. Please be aware that the change cannot be reversed---once \text statements have been converted to something else, there is no automatic way to change them back.
Maple Error Levels (Scientific WorkPlace only)
The Maple/Settings dialog box contains an Error Level box. Here are the meanings of the various error levels:
| Level | meaning |
| 0 | No messages under any circumstances |
| 1 | Beep if there is an error |
| 2 | Display errors in a dialog box |
| 3 | Display memory use in status area |
| 4 | Show all Maple commands sent in the status area |
| 5 | 3 and 4 |
| 6 | Show memory use in dialog boxes |
| 7 | Show all Maple commands sent in dialog boxes |
| 8 | 6 and 7 |
There are eight memory-use numbers displayed. A typical display looks like this:
1001684, 288768, 126.417, 0, 250000, 132847, 140124, 4
The numbers have the following meaning:
| Level | meaning |
| 1 | Total number of words requested of the storage allocator |
| 2 | Total number of words currently allocated |
| 3 | Number of CPU seconds used |
| 4 | Words increment for 'words used' messages |
| 5 | Words increment for automatic garbage collection |
| 6 | Number of words returned in last garbage collection |
| 7 | Number of words available after last garbage collection |
| 8 | Number of times that garbage collection was executed |
Each word takes four bytes. Multiply the word numbers by four to get the number of bytes involved.
Common Problems
Document Will Not Print on a PostScript Printer
If your PostScript printer stops printing before a document has been printed completely, the printer most likely has insufficient memory, or the Windows printer driver settings for memory are not correct. If changing the Windows driver settings does not help, you may be able to fix the problem with one of the newer PostScript printer drivers from the manufacturer. We have placed a new PostScript driver from Hewlett Packard on our ftp site ( ftp://ftp.mackichan.com). In our experience, this new driver manages memory much more efficiently than previous versions and solves most out-of-memory problems.
Printing Fails after One or Two Pages
If printing fails after a page or two, you should increase the Windows printer driver setting for the amount of virtual memory used by the printer driver. Use the Printers icon in the Control Panel. If the problem persists, it may be possible to replace the Windows printer driver with one that does not have the problem.
Some Characters Don't Print Correctly
Some Windows printer drivers have bugs that change the characters printed.
Characters that print incorrectly with some PostScript drivers include
 and
and
 . Characters that print
incorrectly with some HP LaserJet drivers include
. Characters that print
incorrectly with some HP LaserJet drivers include
 and ". Richard Kinch of Kinch
Computer Systems, the supplier of the TrueTeX system used in SW, has included
special workarounds in the previewer/printer to cure many of these problems.
If you experience these problems, use a replacement driver. The PostScript
drivers developed by Adobe Systems can cure the PostScript problems, although
some of our testers have reported that, on some printers, these drivers
produce horizontal lines that are too thick. These drivers are available
directly from the Adobe Systems bulletin board, or from
our ftp site.
and ". Richard Kinch of Kinch
Computer Systems, the supplier of the TrueTeX system used in SW, has included
special workarounds in the previewer/printer to cure many of these problems.
If you experience these problems, use a replacement driver. The PostScript
drivers developed by Adobe Systems can cure the PostScript problems, although
some of our testers have reported that, on some printers, these drivers
produce horizontal lines that are too thick. These drivers are available
directly from the Adobe Systems bulletin board, or from
our ftp site.
Here are some reports from our testers:
HP IIP: I use a HP IIP printer with a cartridge that upgrades it to the equivalent of a IIIP, in HP mode. My printer driver (described by "About") is the Microsoft Universal Printer Driver v 3.1.4 with the HP IIIP V2.1 driver.
-
The "not equals" from the menu bar prints without the /.
-
Switching to "Print TrueType as Graphics," the not equals prints fine.
HPLJ 4/4M and HPLJ IIII: The printer driver supplied by Hewlett Packard for the HPLJ 4/4M has bugs that
print a box in place of some of the characters. For example, the character
 . One can use the driver for
the HPLJ III to get around this problem. Microsoft's PostScript driver 3.58
has bugs that change some of the characters printed. For example, both forms
of
. One can use the driver for
the HPLJ III to get around this problem. Microsoft's PostScript driver 3.58
has bugs that change some of the characters printed. For example, both forms
of
 are changed to =. The cure for
this is to use a replacement driver developed by Adobe Systems. On a 300 dpi
printer, this driver prints with very thick lines, fraction bars, etc. These
drivers are available directly from the Adobe Systems bulletin board, or from
our ftp site .
are changed to =. The cure for
this is to use a replacement driver developed by Adobe Systems. On a 300 dpi
printer, this driver prints with very thick lines, fraction bars, etc. These
drivers are available directly from the Adobe Systems bulletin board, or from
our ftp site .
Blue Characters in the Preview Screen
The internal Windows font selection scheme automatically switches to the Small fonts when character sizes fall below a certain threshold. When this happens, the TrueTeX previewer displays the characters in blue to alert you that the font that Windows chose is not the font requested. To fix this problem, choose Fonts from the Control panel and remove the Small fonts.
Some Characters Have Poor Spacing on the Screen
The spacing in the blackboard bold and calligraphic fonts is incorrect on screen. However, these characters print correctly. The spaces in the slant font are too big, resulting in large gaps on the screen. This font also prints correctly.
Weird Characters Appear in Calligraphic and Blackboard Bold
The calligraphic and blackboard bold letters are implemented as uppercase only. The characters are part of other symbol fonts. This means that if you enter anything other than uppercase letters using these tags, you will see (and print) the symbols that occupy the appropriate positions in the symbol fonts.
Previewer Shows Text Outside the Blue Lines
In the previewer, the blue lines outline the text area as indicated by the .dvi file. Some styles cause text to print outside this area. Although the result looks strange on the screen, the previewer is correctly reflecting an "error" in the style.
GROWSTUB Error
If you see a dialog box complaining about a GROWSTUB error, you are the victim of a conflict between Microsoft's Win32s and Microsoft's POINTER.EXE program. POINTER.EXE provides for enhanced mouse behavior, including enlarged pointers when the mouse is moving. The cure for this problem is to disable POINTER.EXE by removing all references to it from your WIN.INI file. The alternate cure is to get an update to version 9.01b of POINTER.DLL from Microsoft. The update is available by anonymous ftp from ftp.microsoft.com and can be found in the file HD1061.EXE, a self-extracting archive file. This file can also be found by anonymous ftp at our ftp site in the directory /Misc/microsoft.
Markers and Their Ilk in Headings
Certain public domain styles cannot handle markers in section headings. The difficulties are caused by the TeX macros that deal with the generation of a table of contents. We recommend that you put section markers in the text immediately following the heading.
Also, we have sometimes seen problems caused by \newline commands in chapter or section headings. Since it is often necessary to insert newline commands in headings, we suggest that you duplicate the heading in brackets at the start of the heading and put the newline command in the unbracketed text. The bracketed text, sometimes called the short version of the heading, is used to generate the table of contents and running heads. Thus, a long heading with a marker and newline should look like this:
This is a Long Heading with a Marker and a Newline
to Break it
Footnotes in Headings
Avoid footnotes in headings wherever possible. If you must put a footnote in a heading, use the technique described for markers in the preceding section. The problems arise because LaTeX tries to deal with the footnote when building a table of contents and running headers. If you put footnotes in the part of the heading that is used for the table of contents and running headers or footers, you can end up with the same footnote appearing on every page.
SW Ignores the Number of Points Setting in Plots (Scientific WorkPlace only)
Maple chooses a default minimum number of points for a plot. If you request a number less than this minimum, Maple uses its own minimum.
ODE Numeric Chokes (Scientific WorkPlace only)
If you set the number of digits used in computation to 40, then try to solve a differential equation using ODE Numeric, Maple will return a function. However, if you try to use that function, Maple will work for a considerable time and then display an error message. Before you try again to obtain a numeric solution for a differential equation, clear the definitions.
Win32s Fails to Install if You Have a WinJet 800
If you have a WinJet 800 (host based PostScript compatible printing for the HPLJ III) installed under Windows 3.1, Win32s will not install properly.
The solution is as follows:
-
Comment out LaserMaster device drivers in the [386Enh] section of your system .ini file.
;device=lmharold
;device=lmmi.386
;device=lmcap.386
-
Reboot Windows 3.1.
Win32s 1.15a will install.
-
Remove the comments after installation and reboot.
This problem may exist with other WinJet products by LaserMaster.
Unix Systems Cannot Print SW Output
Windows PostScript drivers insert a Ctrl-D at the start of a print job. If you use one of these drivers to print to a file, then attempt to copy it to a Unix printer, the job will fail.
The PostScript printer driver inserts the Ctrl-D (PostScript end-of-file) at the beginning of every print job to reset the printer. Because Unix systems recognize Ctrl-D as an end-of-file character, any print files you create by using the PostScript printer driver do not print in Unix because the system thinks the file has zero size. You can correct this problem by removing the Ctrl-D from the print job. To do this, add the following setting to the [ModelName,Port] section of the win.ini file (where ModelName is the name of you PostScript printer model):
CtrlD=0
For more information about editing the win.ini file, see the winini.wrionline document.
If You Have PCTCP
A number of users have reported a fundamental conflict between SW and PCTCP, another vendor's TCP/IP product for DOS. One manifestation of this conflict is that SW will lock up on starting if you have PCTCP drivers installed. Other people have reported difficulty when installing SW. At the time of this writing, no solution has been found, other than disabling PCTCP when SW is to be run.
File Names
LaTeX won't compile documents with spaces in their names or in the names of the directories containing the document. In general, use 8-character names with 3-character extensions to make your documents more portable.
Added 01/01/96
This document was created with Scientific WorkPlace.